Byzantine Chainmaille Instructions
- Beginner
- Beginning Weaves
- Bracelet
- Byzantine
- Chain Weave
You'll need
- Byzantine Chain Bracelet Kit: rings, a sterling toggle clasp handmade in Bali, and a twisty tie
- or the Byzantine Chain Bracelet Kitpack: the same rings plus clasp, without instructions, tools or extras
- Two pairs of pliers
- Optional: a Rocket Tool, an awl or a toothpick to help arrange the fold
- New to chainmaille? Start with the Apprentice Guide to Chainmaille Jewelry Making
About Byzantine
In addition to the weave itself, each kit in our Beginning Weaves series teaches specific techniques designed to lay the best possible foundation for more advanced chain weaving skills. Byzantine is a beginning chain maker’s first introduction to achieving visual complexity in a pattern through relatively simple manipulation of rings on the working end of a chain as it’s woven.
To understand this concept, look at a Byzantine chain and imagine how you might assemble rings to achieve this pattern if you had no instruction. A determined individual could look at the pattern and figure out a way to replicate it, starting with a pair of rings linked through another pair, holding one ring out at an angle while wedging another through them all and holding spaces open with a number of toothpicks, etc. It can be done, but it’s awkward and slow and really requires more hands than the average person is sporting.
Weaving Byzantine chain is actually very easy and comfortable and requires no more than the standard two hands. Rings are added two by two and, periodically, pairs of rings are parted, folded back over the last set of rings and locked in place with the next set. Many complex patterns are made much easier than they look by separating, folding back and reaching beneath rings as they hang loose on the working end of the chain. Subsequent rings lock those into place and the patterned sequence begins again.
Byzantine is an incredibly versatile weave, lending itself endlessly to variation. I’ll show you several of the best at the end of the lesson.
Before you begin
Subtract the length of your clasp from your ideal finished bracelet length to determine how long to make your chain. (See our Apprentice Guide for more information on how to determine length, if needed.)
Close at least a dozen rings, as perfectly as possible, and open twice that many. You can prepare more rings than that if you like; just keep the ratio of one third closed to two thirds open.
Step 1. Start with four closed rings
Pick up an open ring with your pliers and scoop four closed rings onto it, then close the open ring. Focus on closing the ring as perfectly as possible.

Step 2. Add a second ring
Pick up another open ring and put it through the same four rings, alongside the ring you just closed, then close it.
Again, focus on getting good closures as you go along. You won’t have room to go back and clean up your closures later, so take your time and do it well initially.

Step 3. Make a 2-2-2 chain and add the twisty tie
Shake it out and you’ll see that you’ve made a 2-2-2 chain. Put the twisty tie included in your kit through the pair of rings on one end of your chain and twist the ends together. This will give you something to hold onto for stability while your chain is small.

Step 4. Let the first pair fall
With the twisty tie tucked into the palm of your non-dominant hand, hold the free end of your little chain between the fingertips of that hand and let the first pair of rings separate and fall to the sides.
To make this part of the instructions very clear, we’ll call the rings that are now parted the first pair. The middle rings are the second pair, and the rings held by the twisty tie are the third pair.

Step 5. Pin the first pair
Shift your fingertips and use them to hold the fallen first pair of rings pinned to the sides of the third pair, as shown.

Step 6. Push the first pair up into a V
Push the outside rings that you’re holding (the first pair) upward as far as they’ll go, so they form a loose V shape within the second pair above them. Photos 6a and 6b show the same position from two different angles.


Step 7. Part the second pair
Part the second pair of rings that are now on top. Notice that this exposes the bottom of the first pair of rings (the same rings you’re holding) between those you parted.

Step 8. Hook in the first locking ring
With your dominant hand, pick up a pair of pliers and use them to pick up an open ring. Hook that open ring through the exposed bottom part of the first pair, the rings you’re holding. The new ring goes into the spot marked by the red arrow in photo 8a.
Once it’s in place, it will look like photos 8b and 8c (the same position shown from slightly different angles). Once you have the new ring in place, you can let go of the chain with your non-dominant hand, pick up your other pair of pliers and close the ring.


Step 9. Add the second locking ring
Pick up another open ring and put it through the same spot, alongside the one you just closed, and close it as well, as shown in photo 9.
Let’s review. You’ve now made one unit of Byzantine, and you’ll repeat these steps to make the rest of the chain. You first made a 2-2-2 chain: this is the base chain of a unit of Byzantine. You then let the end rings fall to the sides, pushed them up and held them while you parted the rings above them. This is called making the fold. You then put two rings through the bottom part of those you were holding. That’s called locking down the fold. Once the fold is locked down, the chain is stable and you can let go of the rings you were holding, and even put the chain down and come back to it later, if you like.

Step 10. Start the next base chain
Pick up an open ring with your pliers, scoop two closed rings onto it, and add it to the pair of rings that are locking down the fold.


Step 11. Complete the new 2-2-2 base chain
Pick up another open ring and run it through the same four rings the last one passed through, and close it. You now have another 2-2-2 base chain in which the initial pair of rings is locking down the fold of the first Byzantine unit.


Tip: using an awl or the Rocket Tool
If you find it awkward to arrange the rings for the fold, try using the sharp tip of an awl to help. If you have a Rocket Tool, it’s perfect for this purpose. If you don’t have an awl, you can use a toothpick. When you’re ready to make the fold, let the rings part and fall to the sides, pin them and push them up, then use the awl to simultaneously part the top rings and poke a space for the locking rings.

Step 12. Let the end pair fall
Tuck the twisty tie into the palm of your non-dominant hand and let the pair of rings at the end part and fall to either side of the chain.

Step 13. Push them up into a V
Press the fallen rings to the sides of the chain and push them up so they form that loose V shape within the pair of rings above them.

Step 14. Part the end rings to make the fold
Part the rings that are now at the end of the chain, exposing between them the bottom part of the rings you’re holding pressed to the sides of the chain. You’ve now made the fold.

Step 15. Lock the fold with one ring
Pick up an open ring with the pliers in your dominant hand and hook it through the exposed bottom part of the rings you’re holding. Once you have it hooked through them, let go of the chain and close the ring.

Step 16. Add the second locking ring
Pick up a second open ring and hook it through that same pair, alongside the ring you just closed, and close it.
Now that you understand the pattern, repeat steps 10 through 16 until your chain is the desired length, or follow the Quick Reference below if you feel comfortable enough with the pattern.


Terminology: units and segments
At the end of step 9 you’d made one unit of Byzantine chain. Two units make a segment. Upon finishing step 16 you’d completed your first segment (photo 16b shows one segment).
The first segment, or any standalone segment, requires 14 rings, but each subsequent segment in a chain requires only 12 rings, because the pair of rings that lock each unit’s fold in place (also called the connecting rings) is the first pair in the base chain of the next unit.
Quick reference
- Pick up an open ring, scoop two closed rings onto it and add it to the pair of rings locking down the last fold. Put another open ring alongside it.
- Tuck the chain into your non-dominant hand with the free end in your fingertips. Let the last pair of rings part and fall to the sides. Pin them to the sides of the chain, push them up and part the pair of rings that are now at the end of the chain.
- Pick up an open ring with your pliers and hook it through the newly exposed rings. Let go of the chain, close the ring, then add another open ring alongside it.
Repeat steps A, B and C until you reach the desired length.
Attaching the clasp
Your kit includes a sterling toggle clasp, handmade in Bali. Toggle clasps consist of two pieces, a circle and a stick. You’ll notice that the stick has a short 1-in-1 chain attached, made of small soldered links. It’s there to provide some slack, making it easier to turn the stick to put it through the circle once the clasp has been attached to your chain.
You can snip off rings to shorten or remove that chain if you like, but don’t do it right away if you aren’t used to using toggle clasps. Instead, leave the chain attached and see how it works and why it’s needed. You can always remove the clasp, snip off some rings and put the clasp back on later. You cannot, however, reattach those rings once they’ve been snipped off.
Open the pair of rings at the end of your chain, slip the last soldered link on the toggle chain onto those rings, then close them so it looks like the photo.
Because there is some natural variance in items that are handmade, the soldered toggle rings might or might not be large enough to attach with two rings. One ring in this size is more than strong enough to hold the clasp if two won’t fit.
Remove the twisty tie, open the two rings at the other end of your chain and slip them through the small soldered ring on the circle end of your toggle clasp. You’ve made your first Byzantine bracelet. Congratulations!


Recommended ring sizes
| Wire gauge (AWG) | Mandrel size | Rings per inch | Inchpack |
|---|---|---|---|
| 12g | 7.0mm | about 14 | Byzantine RD 12g Inchpack |
| 14g | 5.5mm | about 18 | Byzantine RD 14g Inchpack |
| 16g | 4.5mm | about 20 | Byzantine RD 16g Inchpack |
| 18g | 3.5mm | about 21 | Byzantine RD 18g Inchpack |
| 20g | 2.75mm | about 34 | Byzantine RD 20g Inchpack |
| 22g | 2.25mm | about 38 | Byzantine RD 22g Inchpack |
| 24g | 1.625mm | about 50 | Byzantine RD 24g Inchpack |
These are the round-wire ring sizes we cut for Byzantine. Each inchpack holds all the rings for one inch of chain.
Bolder or more delicate versions
The aspect ratio of the rings used to weave Byzantine plays a large part in the appearance of the finished chain. Byzantine is a fairly tolerant weave, meaning that it works within a range of aspect ratios, but the appearance of the finished chain varies radically with changes in ring size.
The rings provided in this kit and the sizes recommended here will result in densely woven chains that are completely flexible. Smaller aspect ratios produce overlapping rings and a slightly kinked chain, or can’t be woven at all. Larger rings will work, but the finished chain will be airier, less substantial and weaker than a chain made from the recommended sizes. (An airy chain can be lovely but should only be used in non-load-bearing positions, such as earrings.)
The sizes recommended here are perfect for our sterling, palladium sterling and platinum sterling rings, but might or might not work with rings made of other materials or with any rings made by other vendors. Due to issues regarding springback (the amount of tension in any given metal), Argentium and copper rings are usually slightly smaller than traditional sterling rings, so before ordering copper or Argentium rings in the sizes recommended here, please check the Shop by Weave section of our website.
Our 18K gold rings have a bit more springback than sterling, so they will be fine in these recommended sizes. Made with 18K gold rings, the chain might have a little more play in it, but our gold rings are quite stiff, so the finished chain will be even stronger than the sterling version.
Variations
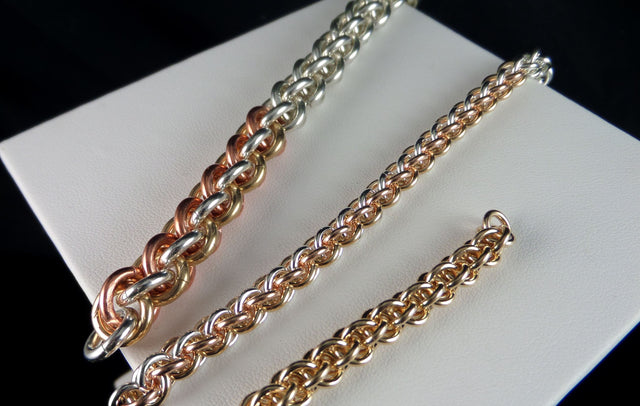
The most basic variation of this chain uses mixed metals. When mixing metals, it’s best to use matched rings in pairs. In other words, don’t lock down a fold with one sterling and one copper ring. Use two rings of the same metal, because the relative hardness of each metal results in minuscule size differences in finished rings. That difference won’t affect the chain as long as the pairs match, but it will show in a mixed pair and can give the chain a slight curve.
The pattern shown here is made by simply alternating metals in pairs as the chain is woven: 2 sterling, 2 copper, 2 sterling, 2 copper, etc. Other patterns can be made by thinking of the total number of rings needed in thirds: two thirds of the rings make up the folds and the remaining third connects the folds together.

Byzantine with bead stations
Individual Byzantine segments can be used between bead stations or other elements. When attaching Byzantine to bead stations, if you use the loop on the bead as the first pair in your base chain, you’ll get a better finished look because it pulls the bead in closer to the chain.
In the bead station photo, the right end of the bead station is attached to the locking rings. The loop at the left end of the bead station actually replaces, and serves in place of, the locking rings, pulling the chain up closer to the beads. This gives the chain a more balanced appearance because it doesn’t have the skinny spot next to the bead station that results from the additional pair of rings.
To attach this way, work outward from the bead station to make your base chain, like this: bead loop-2-2. Then make your fold and lock it down normally.
If you’re attaching bead stations between individual segments of Byzantine, make all your bead stations first and attach 2-2 rings on each loop. Then choose one, make a fold, and slip a ring through to hold it, but don’t close the ring yet. Pick up another bead station, make the fold on one end of it, and then slip it onto the same open ring. Close the ring, locking both folds at the same time. Add a second ring alongside the one you just closed and you have a completed Byzantine segment between two bead stations. It’s a bit tight working in such close quarters, but the finished chain makes the extra effort worthwhile.

Making individual segments
Byzantine segments can be joined in ways other than simply end to end. To make individual Byzantine segments for assembly in other ways, you might find it faster to use the following method.
Make a 2-2-2-2-2 chain using five pairs of rings. Fold back the rings on one end of that chain and lock them in place with a pair of open rings, just as you do when weaving a straight length of Byzantine. Turn the chain over, make the fold at the other end and lock it in place with another pair of open rings. You now have one 14-ring segment of Byzantine. Repeat this procedure until you have as many segments as needed for the project you have in mind.
Variations made with segments
Here are some examples of Byzantine variations made with segments. One is commonly known as Ladder Byzantine. It’s very simple: just connect the tips of the Byzantine segments to each other using pairs of rings in the same size used to make the segments.

In the photo below, from top to bottom, the first three variations are known as Bastardized Byzantine, Romanov with Beads and Romanov without Beads. You’ll find mini tutorials for these three variations by clicking About the Weave on the Shop by Weave – Byzantine page of our website.
The last variation is known as Olivia Chain or the Olivia variation. It’s best when made with multiple ring sizes and a more complex form of connection than is normally used, so we offer the Byzantine Watch Kit to teach it.

Kitpacks (refills)
To make another bracelet just like this one without purchasing whole troy ounces of the sizes you need, order the Byzantine Chain Bracelet Kitpack. You’ll get the same quantity of rings included in the kit plus the clasp, all packaged in the same round tins that came with your kit. Kitpacks do not include instructions, tools or extras, and the cost is commensurately less than the full kit.

Troubleshooting and tips
- Arranging the fold feels awkward: use the tip of an awl, a Rocket Tool or a toothpick to part the top rings and poke a space for the locking rings at the same time.
- Messy closures: close every ring as perfectly as possible as you go. You won’t have room to go back and clean up your closures later.
- Chain is overlapping, kinked or won’t weave: the aspect ratio is too small; use the recommended ring sizes.
- Chain is airy and weak: the rings are larger than recommended. Airy Byzantine is fine for non-load-bearing pieces such as earrings.
- Mixed-metal chain curves: use matched pairs of the same metal; never lock a fold with one sterling and one copper ring.
- Clasp ring too small for two rings: one ring in this size is more than strong enough to hold the clasp.
- Small chain is hard to hold: keep the twisty tie on the starting end until the clasp goes on.
FAQ
What size rings do I need for Byzantine?
See the ring size chart above: from 12g/7.0mm rings for a bold chain down to 24g/1.625mm for a delicate one. Each size has an inchpack with all the rings for one inch of chain.
How many rings does a Byzantine segment take?
The first segment, or any standalone segment, takes 14 rings. Each additional segment in a chain needs 12, because the connecting rings of one unit are the first pair of the next.
Can I use copper or Argentium rings?
Usually, but because of springback, copper and Argentium rings tend to run slightly smaller than sterling. Check the Shop by Weave section of our website before ordering them in these sizes.
Will 18K gold rings work?
Yes. Our 18K gold rings have a bit more springback than sterling but are fine in the recommended sizes, and the finished chain will be even stronger than sterling.
How long should I make my chain?
Subtract the length of your clasp from your ideal finished bracelet length.
Can I teach Byzantine after learning it here?
Byzantine is a public-domain weave, so you may teach it as long as you use your own photos or renderings and your own wording. Using our instructions, even retyped with some words changed, violates our copyright. This kit is not an Urban Maille Exclusive.
Next weave
Now that you’re comfortable with Byzantine, you’re ready for several of our Apprentice Projects, including the Byzantine Watch, two graduated Byzantine necklaces (Bold and Delicate), Byzantine Rose and Box Chain. Apprentice Projects all require that you know one or more of the Beginning Weaves. They don’t repeat the instructions from the Beginning Weaves but build on that knowledge, providing only the additional instruction needed to complete the project, so you never pay for the same instruction twice.
Next weave →Byzantine Rose
Use and limitations
It can be difficult to know exactly which rights are granted with instruction of any sort, so we include this section in an effort to clarify our policies.
Our Weave Kits (Beginning, Intermediate and Advanced) teach chainmaille patterns, many of them ancient, that are not of our own design and reside in the public domain. If you learn a weave from one of our Weave Kits and then wish to teach that weave, you have every right to do so as long as you use your own photos or renderings and your own wording in the instructions. Using our instructions, even if you retype them and change some of the words, is a violation of copyright and other intellectual property rights.
Some of our Project Kits (Apprentice, Journeyman and Master) are simple variations of standard weaves and the same rules apply as described above. Those marked as Urban Maille Exclusives, however, are our own copyrighted designs and do not reside in the public domain. If you have purchased a kit, you are granted the right to make and sell the piece as many times as you like, but we reserve the right to teach those designs ourselves. Because they are unique designs and we don’t grant permission to teach them, sharing or publishing ring sizes and other particulars, privately or publicly, or teaching them, even with photos or renderings and instructions you’ve prepared yourself, is expressly prohibited and constitutes a violation of Urban Maille’s copyrights and other intellectual property rights. This kit is not an Urban Maille Exclusive.
Thank you for allowing me to be your instructor for this weave. I hope that you’re pleased and that you’ll choose us again for your next adventure in this beautiful, ancient art. — Aislyn
© 2003–2010 Urban Maille, Inc.® All Rights Reserved.