European 4-in-1 Chainmaille Instructions
- Bracelet
- European 4-in-1
- Intermediate Weaves
- Sheet Weave
- Weave
You'll need
- European 4-in-1 Bracelet Kit: rings plus a handmade sterling two-strand box clasp from Bali
- or the European 4-in-1 Bracelet Kitpack: rings only, for refills or if you already have the booklet and a clasp
- Two pairs of pliers (no teeth)
- New to opening and closing rings? Start with How to Make Chainmaille Jewelry (our free Apprentice Guide)
About Intermediate Weave Kits
Intermediate is an experience level, not a prerequisite: you don’t need to know any other weave, and these steps start from scratch. Our Beginning Weave Kits each contain information on the sorts of tools you need to make chain and on how to close rings perfectly. At this level, it’s assumed you know those things and the information isn’t repeated here. If you need that foundation, you’ll find it in How to Make Chainmaille Jewelry (the free Apprentice Guide on our website).
Note: Our beginning kits all teach rope weaves, meaning the weave produces a rope-like chain. European 4-in-1, however, is a sheet weave, meaning that it can be woven as wide as you like and used in ways similar to fabric. Chainmaille clothing items (dresses, etc.) are usually made from this weave or one of its variations, as is chainmaille armour. In order for maille armour to be functional, the rings must be soldered or riveted, unlike those used for jewelry.
About the weave
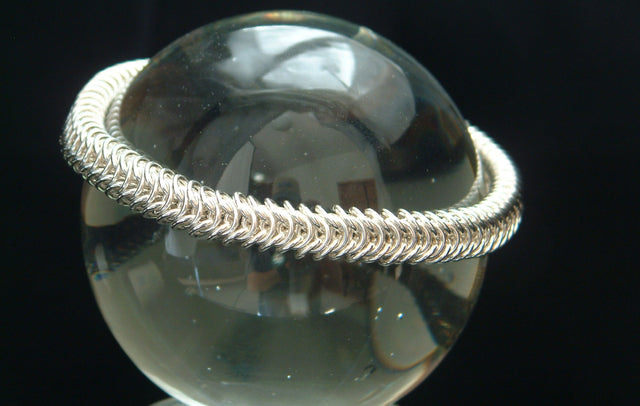
European 4-in-1 has a grain, a direction in which it lays, similar to overlapping fish scales. The second row overlaps the base row, the third overlaps the second, and so on.
It’s important to make sure that you work from the direction that will make your piece lay the way you want it to. For this project, we’ll work in rows the width of the chain so that the scales overlap from one end to the other, which looks nice for a bracelet. For a choker, it looks best if the base row is the length of the chain, around the neck, and rows are added downward from there. If that isn’t completely clear, it will become more so as you learn the weave.

Weaving European 4-in-1
There are many different methods for weaving European 4-in-1, but probably none easier nor more straightforward than the way you’re about to learn.
Step 1. Close and open a dozen rings each
Begin by closing at least a dozen rings and opening about the same number so you don’t have to stop until your chain is far enough along to hold its shape.

Step 2. Make a 2-1-2-1-2 base row
Make a 2-1-2-1-2 chain as your base row.

Step 3. Lay the chain on your fingertip
Lay the chain along the tip of your left forefinger (if you’re right handed) as shown.
With your left thumb, draw the top layer of the chain gently toward yourself with a smearing motion, so that the rings lay as shown in the photo.
Notice that there’s now a row of rings at the back or bottom (farther away from you) and another row in front or on top (closest to you).
For ease of instruction, look at this chain as 3 vertical columns: left, middle and right, each with 2 rings now. The single rings connecting the columns will be called connectors, and we’re going to weave them from left to right.

Step 4. Add the first left-to-middle connector
While holding the chain in this position, pick up an open ring with your pliers and scoop two closed rings onto it. Insert the open ring down through the bottom ring in the left column, then up through the bottom ring in the middle column.
Pick up your other pair of pliers in your left hand and close that ring, then arrange the chain back onto your finger in the same way it was before. Lay the dangling closed rings out as shown.


Step 5. Add the middle-to-right connector (the tricky part)
Pick up an open ring with your pliers and scoop 1 closed ring onto it. This is the tricky part, so pay close attention.
Put the open ring down through the last ring in the middle column and the ring above it in that same column.
Turn the chain in your fingers as necessary to enable you to come up through the last ring in the right column, as shown in the photo.
Close that ring and lay your little chain out on your fingertip. If your chain looks like this, the hard part is behind you now.


Step 6. Repeat the left-to-middle connector
Pick up an open ring with your pliers and scoop two closed rings onto it. Put the end of the ring down through the last ring in the left column, then up through the last ring in the middle column, just as you did before. Close that ring.

Step 7. Repeat the middle-to-right connector
Pick up another open ring with your pliers, scoop one closed ring onto it, then put it down through the last ring in the middle column and the ring above it, then up through the last ring in the right column. Close that ring and lay your chain out as shown.
Repeat steps 6 and 7 until your chain is the right length and you’re ready to add the clasp. Enjoy your weaving.


Attaching the clasp
The easiest way to explain how to attach the included handmade, sterling silver, two-strand box clasp (from Bali) is with a photo.
You’ll notice that one end of the chain curves up slightly and the other end curves slightly downward. That’s characteristic of this weave and must be taken into consideration in the selection of a clasp. This type of clasp works perfectly with this weave.
Simply add an extra row of connecting rings at each end of the chain to hold the clasp.
Congratulations, you’ve just made your first European 4-in-1 chain bracelet. Yay!

Polishing your bracelet
When you’ve finished making your bracelet, you might notice that the rings aren’t as bright and shiny as they were when you started. This is because working the metal rearranges its molecules, ruffling them up a bit. But no worries, you’ll soon have it shining brilliantly again.
There are lots of ways to polish silver, but simple and non-toxic is always best. Use an old toothbrush to give your new bracelet a thorough scrubbing in your hand with a paste of baking soda and water. Baking soda does wonders for silver, removing tarnish and bringing out the shine.
Now you must decide if you want the brilliant finish of shiny new silver or the muted gleam and depth of an antique finish. If you want it bright, it’s ready to wear. The silver will tarnish over time, especially if it’s exposed to sulfur or chlorine, but you can polish it shiny again with baking soda or a silver polishing cloth as often as you like.
You can polish your chains to a brilliant shine using a clean rock tumbler with mixed stainless steel shot as the tumbling media, along with water and a little dishwashing liquid. (If you have a choice, it’s better to get shot without pins so you don’t have to pick them out of your chains after tumbling.) Tumble thirty minutes to several hours, according to your preference, and your chains will shine as brightly as our loose rings. We tumble polish every last one of them for 2–3 hours before sending them out in the world to make something of themselves.
Adding an antique finish
A beautiful antiqued look results from tarnishing the chain thoroughly, then polishing the tarnish from the high spots, leaving it dark in the crevices. Sulphur is a powerful tarnishing agent, available as a chemical (Liver of Sulphur), in the water of natural sulphur springs, and in eggs.
To use an egg, hard boil it and cut it in half while it’s still hot. Seal it in a plastic bag or dish with your bracelet, but arrange them so they aren’t touching to avoid spotting your silver. Leave it overnight, or until it’s dark enough.
When it’s as dark as you like, wash and dry it thoroughly, then polish it with baking soda or in your tumbler to shine up the high spots. Work with it until it’s just right. Tarnish wears off over time where it brushes against clothing and skin, but you can re-tarnish and re-polish as often as you like.
Ring sizes for European 4-in-1
The bracelet in this booklet is woven in 16g rings. European 4-in-1 works in many gauges, though, and these are the sizes we cut for it. Each inchpack holds all the rings for one inch of chain, so you can order exactly the length you need with no ring math.
| Wire gauge (AWG) | Mandrel size | Rings per inch | Inchpack |
|---|---|---|---|
| 12g | 6.0mm | about 25 | Euro 4-in-1 12g Inchpack |
| 14g | 5.0mm | about 31 | Euro 4-in-1 14g Inchpack |
| 16g | 4.0mm | about 36 | Euro 4-in-1 16g Inchpack |
| 18g | 3.0mm | about 72 | Euro 4-in-1 18g Inchpack |
| 20g | 2.75mm | about 100 | Euro 4-in-1 20g Inchpack |
| 22g | 2.0mm | about 160 | Euro 4-in-1 22g Inchpack |
Sizes are gauge / mandrel size, round wire. The actual inside diameter runs slightly larger than the mandrel because the wire springs back after winding. Inchpacks come in sterling, silver-filled, yellow gold-filled, rose gold-filled and Argentium.
Kitpacks and next projects
Refills for this and all our kits are available on our website as European 4-in-1 Bracelet Kitpacks. When you’ve mastered the intermediate weaves, you’re ready for our Journeyman Project Kits: an array of beautiful chain jewelry you can make using what you’ve learned. A natural next step from this weave is the Graduated European 4-in-1 Collar.
Troubleshooting and tips
- Confused about columns: after the smearing motion on your fingertip, think left / middle / right columns of two rings each, with connector rings between them.
- Step 5 feels impossible: the open ring must go down through both rings in the middle column before coming up through the right column. Turn the chain in your fingers as needed.
- Chain curves at the ends: that’s characteristic of European 4-in-1. A two-strand box clasp works with that curve.
- Dull rings after weaving: work hardening ruffles the metal. Polish with baking soda paste, a polishing cloth, or a tumbler.
- Want a choker instead of a bracelet: run the base row the length of the neck and add rows downward so the grain overlaps that way.
FAQ
What is European 4-in-1 chainmaille?
It’s a sheet weave where each new ring typically passes through four others, building a flat mesh with a fish-scale grain. Unlike rope weaves, it can be woven as wide as fabric.
Do I need to know another weave first?
No. Intermediate describes the experience level, not a prerequisite: European 4-in-1 isn’t meant as a first-ever project, but you don’t need to know any other weave. Like all our weave kits, these instructions start from scratch. If opening and closing rings is new to you, our free How to Make Chainmaille Jewelry guide covers it.
How do you start European 4-in-1?
Close and open about a dozen rings each, make a 2-1-2-1-2 base row, lay it on your fingertip, draw the top layer toward you, then add connectors left to right.
Why does one end of my chain curve up?
That’s characteristic of this weave. Choose a clasp that works with that curve; the kit’s two-strand Bali box clasp does.
How do I polish European 4-in-1?
Scrub with a baking soda and water paste, use a silver polishing cloth, or tumble with stainless steel shot, water and a little dishwashing liquid.
Can I antique the finished bracelet?
Yes. Tarnish it thoroughly (egg sulphur or Liver of Sulphur), then polish the high spots so the crevices stay dark.
Next weave
When you’re comfortable with European 4-in-1, try the Graduated European 4-in-1 Collar or explore the other Intermediate Weaves, Double Spiral 4-in-1 and Parallel Chain, or Half Persian 4-in-1 from our Advanced Weaves.
Next project →Graduated European 4-in-1 CollarThank you for allowing me to be your instructor for this weave. — Aislyn
© 2003 Urban Maille ChainWorks / Urban Maille, Inc.® All Rights Reserved.