How to Make Chainmaille Jewelry
- Beginner
- Design
- Finishing
- Getting Started
- Techniques
- Tools
New to chainmaille? Start with our Introduction to Chainmaille, then come back here.
You'll need
- Two pairs of jewelers’ pliers without teeth: flatnose, chainnose or bent chainnose, in any combination (we carry Beadsmith Pliers and Eurotool Pliers)
- Optional: the Rocket Tool, an awl with the perfect taper for chain making
- Optional: a Ring Tool, worn on your forefinger, for fast ring opening
- A fine file (or an old nail file) to smooth new pliers
- Good lighting, and a table or a lap tray with something non-slip on it, like velvet, suede or blanket fabric
Weaving maille
This Apprentice Guide covers the tools and ring-handling skills every chain needs, then the basics of designing and finishing chainmaille jewelry. Steps 1 through 7 are the hands-on part.
Step 1. Choose two pairs of pliers
There are three types of jewelers’ pliers appropriate for making chain: flatnose, chainnose and bent chainnose. You’ll need two pairs of pliers: two of any one type, or one each of any combination of types. Which pliers to use, and in which hand to hold each pair, is completely a matter of personal preference. Whatever your preference, to avoid marring your precious metal rings, never use pliers with teeth.
These photos show some of the best ways to position the various tips for opening and closing rings: photo 1 is chainnose and flatnose; photos 2 and 3 are bentnose and flatnose.


Step 2. Smooth and tune new pliers
New pliers are likely to need a little smoothing before you use them so they don’t scratch your shiny rings. Run a fingertip over the inside jaws, and if you feel anything scratchy, even a little bit, use a file to smooth it out. If you don’t have fine files meant for steel, an old nail file will do the job. Don’t get so enthusiastic when filing that you round off the corners or make the tool faces uneven, but don’t be afraid to smooth the entire surface and gently round the edges. Even smooth tool surfaces can mark precious metal rings if you grip them too hard, but smooth tool surfaces make prettier and less obvious marks. (Photo 4)
New pliers might seep oil from the joint for a time, so be careful of your clothes at first. Just wipe off the oil when you notice it. If your new pliers are stiff, work the handles to distribute the oil throughout the joint.
Tension is provided by leaf springs between the handles, and it can be adjusted by gently bending them. Bend them toward the middle for more springiness; press them more closely to the handles for less springiness. (The Lindstroms adjust differently, with a three-position durable plastic biospring.)
You can work neatly at a table, or manage quite well with just a small work area in your lap while reclining comfortably, as long as the lighting is good. A lap tray is nice for working this way; just put a bit of something non-slip on it, like velvet, suede or blanket fabric, so your rings stay where you put them.

Step 3. Add a pointy tool: the Rocket Tool
The Rocket Tool is an awl with the most perfect taper for chain making. Use the pointy end for moving rings out of the way, opening a little space to put another ring through, etc. Some weaves are almost impossible without a pointy stick, and this is much nicer than a toothpick. I have other awls, some that aren’t comfortable in the hand, some with points that are too fat or too sharp, but this one is just right.
The other end, which is fan shaped, can be used to remove and replace watch pins or as a blade for opening letters, packages, etc. It’s a handy little tool. (Photo 5)

Step 4. Or try the Ring Tool
Some people prefer to use one pair of pliers and a Ring Tool, especially for opening rings. The ring tool is generally worn on the forefinger of the non-dominant hand. One side of a ring is fitted into the appropriate sized slot in the ring tool, while the other side of the ring is grasped with a pair of pliers in the dominant hand and twisted open or closed.
Closing rings this way can be tricky, especially in tight spots, but many people find it to be a fast and convenient way to open rings. (Photo 6)

Manipulating rings
The beauty and strength of every handmade chain, from the simplest to the most ornate, depends absolutely on the chain maker’s ability to close the rings perfectly, with joins so neatly butted they disappear, so smoothly aligned that a fingertip can hardly feel the edge of the closure.
Step 5. Open rings by twisting
To keep the rings round, twist them open; never pull them apart. Once pulled out of true, the ring will never lay perfectly round and flat again.
With the cut ends of the ring in the 12 o’clock position, grasp the ring on either side, at 3 o’clock and 9 o’clock. Pull one end of the ring toward you and push one end away. Again, the rings must always be twisted open like this, never pulled apart. (Photos 7 and 8)


Step 6. Close rings with tension
When closing a ring, your goal is to create tension in the metal that will push the two ends of the ring firmly together when they’re lined up, ensuring the tightest possible join.
To do this, press slightly inward with your pliers as you twist the ring closed, passing the point at which the ends would meet, then pull them very gently apart, only as far as needed to bring the ends back together. You’ll hear and feel the ends rub against each other as they slide into place. (Photos 9, 10 and 11)
The tension you create in the metal by pushing the ends past one another will keep them pressed tightly together when you’ve lined them up to meet evenly. If the ends do not line up perfectly the first time, simply repeat the procedure in smaller increments until they do.
Work hardening. You’ll notice that the metal becomes stiffer as you work with it. This is called work hardening, and it’s the result of rearranging the molecules in the metal by bending it. Hardening the rings as you work them makes the finished jewelry stronger, so it’s good… to a point. If you work it too long, the metal will become brittle and the ring will eventually break in half. If this happens, the metal was severely overworked. Gently hardening the metal without destroying its resilience is the goal.


Step 7. Avoid marks and distortion
When taking a ring in your pliers, try to grasp as much of each half of the ring between the tool tips as possible (see photo 7). Spreading the grip of the pliers over more of the ring’s surface allows the ring to be held securely with less force, reducing slips and the number and severity of tool marks left on the rings. This also helps eliminate a common problem known as ‘pringling’, in which closed rings show a characteristic potato chip shape due to an uneven application of force when closing the ring.
Make an effort to close each ring as perfectly as possible as you go along. Going back later to neaten up closures is far more difficult than simply doing it well the first time, because you won’t have nearly as much room to maneuver within a completed chain as you do at the working end of a chain in progress.
Tip: To weave most efficiently, try to keep your pliers always in your hands while using your fingertips to manipulate your chain as needed. It might feel a bit awkward at first, but if you learn from the beginning to manipulate the chain without putting your pliers down more than absolutely necessary, you’ll weave chain much more quickly once the pattern is familiar.

Design
Technical skills vs design skills
I answer a lot of questions from people planning a piece of jewelry for someone special. Sometimes it’s a gift, sometimes it’s that first unexpected sale. (Where did you get that?! Really?! Can you make one for me?) Either way, it’s usually a nervous time for a fledgling jewelry designer, because that’s when you find out just how much you don’t know. Whether you’re making jewelry for gifts or profit, you want the intended recipient to love the way he or she looks and feels wearing it. Most of making that happen is in the design.
If you think of structural engineering and technical precision as the left brain aspects of making chainmaille jewelry, then design is the right brain’s contribution. You need both, though you wouldn’t necessarily guess that based on what you see for sale. A piece of jewelry that looks amazing until you get up close is all design and no precision, all right brain, no left. When you see a perfectly executed weave that does absolutely nothing for you, that’s all left brain and no right, all precision, no design. Your jewelry will be much better if you cultivate both sets of skills and use them together.
Technique, talent and aptitude
As I see it, we’re each born with a little gift basket of talents and aptitudes. Each potential gift comes in a wide variety of sizes, and each assortment is unique. Some people have one huge thing and become stars in that field, but most of us have a lot of little ones and some not so little ones, and what suits us best isn’t so obvious because it comes from a combination of those gifts rather than just one. The more of your gifts you bring to bear on your work, the more satisfaction you’ll find in it and the more uniquely your own that work becomes. There’s the recipe for creating your own niche. But how do you get from here to there?
One gift you might have is ‘an eye for design’. To me, that means that a person has an innate knowing, a feel for when something is right and when it isn’t. Allowing your work to be guided completely by that knowing, following wherever it takes you and learning whatever it calls for is, I believe, the best way to reach your true potential.
But when you’re first learning to make jewelry, you aren’t free to follow that muse because, no matter how many designs pop into your mind, you never seem to know the right techniques. You might be a never-ending fountain of inspired design, but you can’t do much with it yet because you don’t have a repertoire of techniques at your disposal with which to bring those designs into being. At this stage, design is exciting and wild with possibility but ultimately more frustrating than fun. How can you know if you even have an eye for design, much less develop it, if you can’t make any of the things you’re dreaming up?
Give yourself a chance to ripen into your talents by spending that time developing your palette of techniques. Focus on learning instead of designing, for a time. Learn a new weave, use it to make simple chains in different sizes (by simple, I mean a chain and a clasp) and keep them or give them away if you can. Sell them only if it’s necessary in order to continue working. Then learn another weave and repeat. Learn some good embellishment techniques and practice them until the results are beautiful and easy to repeat. Then start embellishing those simple chains in simple ways, with a bead link, a drop, some charms. Use this time to refine your workspace and make it more conducive to design. (More on that in my book excerpt on our website.)
When you feel ready to push your design envelope, give yourself something inspiring to play with and a good stretch of time to play with it. Amazing things happen at the intersection of preparation and inspiration.
It’s better for the reputation of your business if you don’t start selling until your workmanship is consistently professional. That takes some practice. On the other hand, you won’t have a reputation to worry about if you can’t buy the supplies you need to progress, so if you must sell your early work, be particular about your ring closures and stick to our recommended ring sizes for all your weaves. And get a tumbler. If you choose unisex clasps, you’ll double your potential market, because men love simple chains as much as women do. If you’re considering jewelry as a business, then business is an inextricable component of your design, so you might want to read the Zen essays in the ARTLAB section of our website.
Basic elements of design
In order to soar, you must first learn to fly, so the rest of this guide is devoted to basic and practical elements of design, all of which come down to pleasing the customer. If you can’t please a customer, you’ll be the only one wearing your jewelry, and that’s no fun. These are not hard and fast rules; they’re simply things to consider as you begin designing for others.
Chain weight
It’s logical to assume that heavy chains are for men and delicate chains are for women, but there are some notable exceptions. Delicate chains always look good on small women, but they can make a larger woman appear larger still, by contrast… and women do not want to look larger. (I’m 6’ tall and no delicate flower, so I know of what I speak.) A wide and/or heavy weight chain makes a woman’s wrist look amazingly delicate by comparison, and that is very flattering. This might not be the kind of thing you want to mention in conversation, but draping a heavy chain over a bigger girl’s wrist so she can see that effect for herself is all the speaking you’re likely to need to do on that subject.


Feminine vs masculine
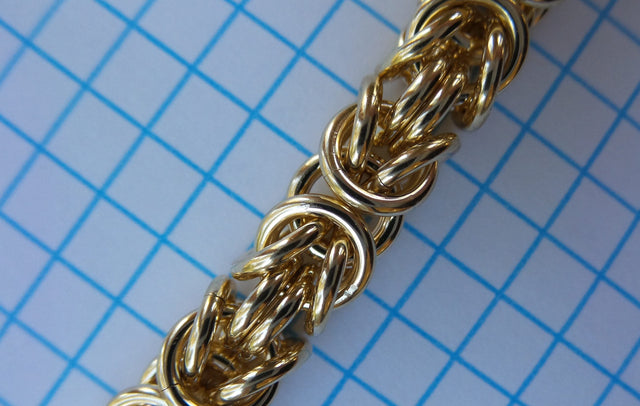
The smaller and more delicate the chain, the more feminine it looks. The heavier and chunkier the chain, the more masculine it looks. The impression a chain makes, as more masculine or feminine, isn’t just about size, though; it’s in the balance of all aspects of the chain. Take ring shape, for example. Multistrand rings look feminine, round rings look neutral and square rings look masculine. Then there’s the weave: ornate looking weaves like Byzantine or Double Spiral tend to seem more feminine, while plain and snaky looking weaves, like 3-in-3, Box Chain and Half Persian, tend to seem more masculine.

So how to balance all that? Well, Half Persian made with heavy gauge square rings looks so masculine that I’ve never met a man who didn’t want it on sight. It’s masculine in all three aspects. Whereas Half Persian made with heavy gauge round and multistrand rings looks like heavy lace and is therefore quite feminine looking, even though it’s a substantial chain. (This makes it perfect for the aforementioned bigger girl.) Byzantine looks ornate and therefore feminine, but if you make it with heavy or square rings, a lot of men will wear it… though not all men. (For that one, I use the pink shirt test. If your guy wouldn’t be caught dead in a pink shirt, he’s probably not going to wear Byzantine either. But he’d probably like Box Chain, even made with 18g rings, because the weave is just that masculine looking.)


Again, these are not rules; they’re observations from many years of teaching, answering questions, making recommendations and hearing how it went. Some men are metrosexuals and some are lumberjacks. Some women are girly girls and some are tomboys at heart. If your girl favors jeans and white shirts, she might favor the clean lines of one of the more masculine chains as well. But if she’s a real girly girl, she’s likely to prefer her chains ornate and embellished.
Type of piece
Jewelry calls attention to the area where it’s worn. Young women with very smooth skin look good in anything, of course, but that’s the only time in life that most women feel chokers are truly flattering. (A choker is a necklace worn high on the column of the throat, as opposed to at the base of the throat or lower.) Longer necklaces that draw the eye lower are generally preferred by women whose necks aren’t as smooth as they once were. Again, there are always exceptions, and these broad generalities are only meant to help you avoid some of the potential awkwardness of inexperience.


About earrings
When making earrings, weight is always a major consideration. Heavy earrings drag painfully on the earlobe and can cause the piercing to stretch into a line. (Earrings that cover the piercing are popular for this reason, especially with older women.) How heavy is too heavy depends on the woman, just as does how long is too long. Keeping in mind that people tend to have specific preferences on those issues, match what you give or show a person to what she wears, for the best chance of suiting her tastes.
Clasps: choosing and using
There are several important considerations to choosing a clasp.
Material: The clasp should match the other metal used in the jewelry. If there is more than one type of metal in the piece, those metals are your choices for the clasp. Since there are vastly more clasp choices to be had in sterling than in any other metal, anytime you have the option of designing a piece in another metal in such a way that a sterling clasp can be used, you will avoid limiting your options and making life difficult for yourself. A sterling clasp works with any silver alloy (sterling, Argentium, palladium sterling, platinum sterling, etc.), but what about copper and 18K gold? When making pieces in metals other than sterling, if you add sterling accents or a sterling focal point, then you can also use a sterling clasp. Copper and sterling look gorgeous together, are easy to clean together, and the sterling bits add to the value of a copper piece. (If you need to make a pure copper piece, though, keep in mind that there are a lot more copper plated components available for sale than solid copper ones, and search accordingly.) Mixing sterling (especially platinum or palladium sterling) with 18K gold really brings up the value of the piece, and sterling is much, much whiter than white gold, so the contrast is more dramatic and very beautiful.
Weight: When choosing a clasp, you must consider the visual weight as well as the actual weight. Visual weight refers to how heavy the clasp looks relative to how heavy the rest of the piece looks. A weighty, substantial looking chain looks wrong with a delicate, airy clasp… just as a delicate, airy chain looks wrong with a big ol’ rodeo buckle of a clasp.
Then there’s actual weight. Let’s say you make a chain bracelet and you put a clasp on it. The clasp is 1” long. When the clasp is engaged, you have a circle of chain with a 1” gap in it, and the clasp sits within that gap. If the weight of that clasp is less than the weight of 1” of that chain, the clasp will tend to rest on top of the wrist when worn. That’s desirable if the clasp is the intended focal point of the bracelet, but otherwise, not so much. If the weight is equal to the same length of chain, the bracelet will tend to move freely around the wrist and the clasp might be anywhere. That’s absolutely charming when intended, not so charming if you meant the clasp to hang beneath the wrist. If the clasp is intended to hang down, it needs to be heavier than the amount of chain it’s displacing. By the same principle, necklace clasps will tend to stay at the back of the neck if they weigh less than the chain they’re displacing, and to migrate toward the front if they weigh more.
Type: Decide which types of clasps best suit the look and functional requirements of the design. (View the Components section of our website to see a variety of clasp types.) For example, a wide chain looks better with a multistrand clasp; a heavy bracelet should have a safety (so a spontaneous wave of the arm doesn’t take out a co-worker); toggles are only secure if the piece has some weight; and no one enjoys fiddling with tiny, difficult clasps, but they can be completely unworkable for people with any form of joint stiffness.
Style: In short, this means that if the necklace has a modern industrial look about it, you might want to think twice before giving it a Victorian clasp. With experience, you’ll likely settle into a style of your own and your clasp choices will reflect that, but in the meantime, and generally speaking, simply styled clasps are easier to use because they suit a range of jewelry styles. The exception to this is when a piece is designed around a clasp as the focal; in that case, go as fancy as you like.


About magnetic clasps. Magnetic clasps can be a wonderful solution, but they have limitations. They’re fabulous for necklaces but not so good for bracelets. The problem is they stick to things, like shopping carts in the grocery store, and jewelry gets lost. And although they’re a joy for necklaces, especially for arthritic fingers, magnets are used as the on/off mechanism for some types of pacemakers. It’s extremely unlikely that 1) a pacemaker might be affected by the type of (relatively weak) magnet used for jewelry, and 2) that a magnet clasping a necklace might come into the exact type of contact required to activate a pacemaker, but that situation isn’t impossible, so it must be mentioned.
Attaching clasps and adding charms
Since there’s no way to know exactly what size ring will be the most perfect for attaching a particular clasp to a particular chain until you’ve tested it, I suggest purchasing an assortment pack of rings in whichever metals you use. Assortments are available by metal, shape and weight, so you might order, for example, 1 troy ounce of round sterling assortment. Assortments are mixes of all the rings we make (in the chosen shape and metal), ranging from 22g/1.5mm to 12g/12.0mm. This pretty much assures you’ll have the perfect ring for whatever you’re doing. If you also acquire an accurate set of calipers, you can measure any ring you like for the purpose of ordering more of the same. (If you don’t yet have calipers, use our ring card for matching. It’s the next best thing to measuring, and we include one with every order.)
Say you want to make a charm bracelet. You can make a bit of chain, find the perfect ring for attaching the charms to it within your assortment pack, then measure that ring and place an order so they’ll arrive before you need them. If you also make strung jewelry, you’ll be so glad to have the assortment pack for attaching clasps to those pieces as well. Our rings are much nicer and stronger than the usual bead store jump rings. I guarantee that once you’ve used them, you’ll never want to go back.

Metal sensitivity
Metal allergies are most likely to show up when metal passes through the skin, so earwires (especially) can’t be made of just anything, and copper earwires generally aren’t a good idea for this reason. Nickel is the metal most likely to cause an allergic reaction, so it’s best to avoid it in general, but especially in earwires. Most base metals contain nickel, as does, surprisingly, most white gold. Nickel is the alloy usually used to make gold white. We use palladium white gold, rather than nickel white gold, for that reason. (Palladium is a member of the platinum family.) None of our metals contain any nickel.
Finishing chain
When you’ve finished weaving your chain, you might notice that the rings aren’t as bright and shiny as they were when you started. This is because working the metal rearranges its molecules, ruffling them up a bit. But no worries, you’ll soon have them shining again.
The blinding shine
You can effortlessly polish your chains to an astonishingly brilliant shine using a clean rock tumbler with mixed stainless steel shot as the tumbling media, along with water and a plain, grease cutting dishwashing liquid. Tumble polishing your chains burnishes the metal, removing surface marks and hardening it slightly, making your chains even stronger as it polishes. Tumble polish for thirty minutes to overnight, according to your preference, and your chains will shine as brightly as our loose rings. (We tumble polish every last one of them for 2–3 hours before sending them out in the world to make something of themselves.) Tumble polishing is explained in detail on our website.
A tumbler will clean and polish even heavily tarnished copper, but if you want the color stripped all the way down to pristine copper pink, give your chain the mild acid bath first.
The mild acid bath
To remove all the tarnish from copper, mix any mild acid (white vinegar, lemon juice, lime juice, etc.) with a little salt. A ratio of one cup liquid to one teaspoon salt works well, but the ratio is quite flexible, so no need to measure. Swish your chain around in the mixture until the copper is pink and clean. It just takes a minute. Immediately rinse with water, then neutralize the acid by coating the chain in a thin paste of baking soda and water. Rub it in, then rinse thoroughly.
It’s very important to neutralize the acid; otherwise, it will minutely pit the metal, creating greater surface area that will tarnish faster and deeper each time. If you use the vinegar and salt solution, you can store and use it many times over. Lemon or lime juice can be refrigerated for reuse but will spoil if left at room temperature. These mild acid baths don’t do much for sterling, but they don’t hurt it, so they can be used for mixed pieces. The effect on copper, though, is rapid and amazing. Copper emerges perfectly pink and clean but with a dull finish, meaning you’ll still need to polish it. At this point, you can throw it in the tumbler and have a blinding shine in under an hour.
A soft glow
If you prefer a warm gleam to brittle brilliance, you might want to try a hand rubbed baking soda finish. Make a paste of baking soda and water and massage it into the chain. The longer you rub it, the more deeply the metal will glow. You can make it a little easier on yourself by using an electric toothbrush. Disposable, battery powered toothbrushes that work well for this purpose are available in grocery and drugstores.
The baking soda paste massage will remove a lot of tarnish but, again, if you want your copper pristine pink, give it the mild acid bath first. This polishing massage will neutralize the acid, so you can skip that step as long as you polish immediately after the acid bath.
The Roman finish
First, the story of why a little pampering can be good for your business. At the end of a long, hard slog (building our database), I was wearily soaking in a steamy bubble bath with my hair up in a twist and my face slathered with a French green clay mask. It was the middle of the day and the sun was shining in the windows, making my bubbles wink with rainbow colors like tiny prisms. A glop of the clay paste had fallen on my tarnished copper and sterling Jens Pind’s bracelet and didn’t rinse off when I dipped it in the water. I rubbed absently at the spot with my thumb, paying more attention to the prism bubbles than to what I was doing to the chain. When I finally did look at it, I was amazed to see colors in the copper: hints of red and pink, blue, purple, green and gold, all softly glowing in the sunlight. The clay didn’t make the colors; they were already there in the tarnish. Copper does that when you wear it all the time. But that super fine, silky clay polished the metal without stripping the colors and made the chain look like a piece of old Roman jewelry.
French green clay is available in health and beauty stores. It’s a very soft, fine, gray green clay powder. Mix it with water and rub your heavily tarnished chain in your hands until you like what you see, then rinse well. The effect isn’t long lasting on a chain that’s worn constantly, but it’s easy, fast and fun to recreate. (And if you’re a multitasker, you might want to have a facial at the same time.) When I sell a chain finished this way, I include a jar of the clay and instructions for renewing the finish as needed.


Antiquing chain
A beautiful antiqued look results from tarnishing the chain thoroughly, then polishing the tarnish from the high spots, leaving it dark in the crevices. Sulphur is a powerful tarnishing agent, available as a chemical (Liver of Sulphur), in the water of natural sulphur springs, and in eggs. To use an egg, hard boil it and cut it up or mash it while it’s still hot. Seal it in a plastic bag or dish with your bracelet, but arrange them so they aren’t touching, to avoid spotting the silver. Leave it overnight or until it’s as dark as you like in the crevices.
When it’s dark enough, wash and dry it thoroughly, then polish the high spots lightly with the finest steel wool (0000 ultra fine or 000 super fine) to remove the tarnish, then wash and dry it again. Give the chain a final all-over polish with a polishing cloth until the high spots shine and the crevices gleam darkly. Work with it until it looks just right. Tarnish wears off over time where it brushes against clothing and skin, but you can re-tarnish and re-polish as often as you like.
Note: It’s best to tumble polish the chain first, so it’s all smooth and pristine, and then antique it. Once it’s antiqued, you probably don’t want to put it in your tumbler again unless you strip off the antiquing first, because the black will contaminate your shot. There are instructions for cleaning your shot on our website, should you need them, but it’s best not to make that mess if you can avoid it. You’ll find instructions for stripping off antiquing (or cleaning off heavy natural tarnish) on the same page.
Au naturel
Another option, especially for jewelry you want to wear constantly, is to let nature take its beautiful course. Some jewelry, especially delicate pieces made with pearls or soft or brittle stones, might not be hardy enough for constant wear, but a sturdy, well made chain is a delightful exception to this rule.
If you wear a chain all the time, make a point of washing it in the shower with water and a soap that doesn’t leave a residue, to remove the daily accumulation of skin oils, lotions, perfume and environmental dirt. The combination of regular simple cleaning and constant contact with your skin and clothing will polish the chain and keep it gleaming bright on the surface and darker in the crevices. The result is a beautifully soft glow that results only from constant wear.
There are lots of manual ways to clean and polish silver, but non-toxic ways are best. A polishing cloth made for the purpose, like our Sunshine Polishing Cloths, is simple to use and can be included with jewelry as a gift. We seriously discourage the use of harsh chemical cleaners. We’ve heard of so many problems with them, from tarnish redeveloping faster after each use to tumbler shot becoming seriously contaminated by tumbling jewelry previously cleaned with chemicals, that it just doesn’t seem worth whatever convenience they provide, especially given their toxicity.
Troubleshooting and tips
- Pliers scratch your rings: never use pliers with teeth, and smooth the inside jaws of new pliers with a fine file or an old nail file (step 2).
- Pliers too stiff or too springy: work the handles to spread the oil, and bend the leaf springs toward the middle for more spring or closer to the handles for less.
- Rings won’t lie round and flat: they were pulled apart. Always twist rings open and closed.
- Gap or misaligned ends: press inward as you twist past the meeting point, then ease back; repeat in smaller increments until the ends line up.
- Ring broke in half: the metal was severely overworked. Harden gently without destroying its resilience.
- ‘Pringled’ (potato chip shaped) rings or tool marks: grasp as much of each half of the ring as possible so you can hold it with less force.
- Messy closures in a finished chain: close each ring perfectly as you go; there’s far less room to fix them later.
- Rings dull after weaving: that’s normal. Tumble polish, or use one of the finishes above.
- Tarnish comes back faster after an acid bath: always neutralize the acid with baking soda paste and rinse.
FAQ
What tools do I need to start making chainmaille?
Two pairs of jewelers’ pliers without teeth: flatnose, chainnose or bent chainnose, in any combination. An awl like the Rocket Tool and a Ring Tool are optional helpers.
How do you open a jump ring?
With the cut ends at 12 o’clock, grip the ring at 3 and 9 o’clock and twist: pull one end toward you and push the other away. Never pull a ring apart, or it will never lie perfectly round and flat again.
How do you close a jump ring tightly?
Press slightly inward as you twist the ring closed, passing the point where the ends would meet, then pull them very gently back until they meet. The tension keeps the ends pressed tightly together.
What is work hardening?
Bending the metal makes it stiffer. A little hardening makes your jewelry stronger, but overworked metal becomes brittle and can break.
How do I make my finished chain shiny again?
Tumble polish it in a clean rock tumbler with mixed stainless steel shot, water and plain grease cutting dish soap, for thirty minutes to overnight.
Do your rings contain nickel?
No. None of our metals contain any nickel, and we use palladium white gold rather than nickel white gold.
Next weave
Ready for your first chain? Flower Chain, 3-in-3 and Byzantine are our Beginning Weaves. Each kit in the Beginning Weaves series teaches specific techniques designed to lay the best possible foundation for more advanced chain weaving skills: Flower Chain, 3-in-3 and Byzantine.
Next weave →Byzantine Chainmaille InstructionsUrban Maille is a mom and pop shop, a little cottage industry high in the mountains southwest of Denver, where Aislyn and Gary Bryan hand make, to fanatically high quality standards, over 10,000 different precious metal rings, plus kits, instructions and supplies, for people who weave chain and chainmaille jewelry.
© 2003–2015 Urban Maille, Inc.® All Rights Reserved.